Documentation
How to use Lumber Optimizer
A short guide to getting started, a breakdown of the algorithms and answers to common questions.
Quick start
From installation to the first cutting layout — about five minutes on an average frame model.
Open a model with a timber frame or a log structure
The plugin works with elements of the Structural Framing category (OST_StructuralFraming). Make sure beams, studs and logs are placed as elements of that category.
Press Lumber Optimizer on the SDM Dev tab
The first window opens — parameter selection.
Specify the section parameters
Choose the parameters the plugin will read the section width and height from. Usually these are family type parameters. Tick “Remember choice” so you do not repeat it on the next project.
Set the grouping parameter and the stock length
Grouping (for example “Level” or “Wall”) defines which elements may be cut from one stock piece in isolated mode. The default stock length is 6000 mm.
Review the estimate
The second window shows volumes for every section, the beams that were found and the elements that were skipped with the reason. The “General”, “Recommended” and “Isolated” modes are switched here too, and the selected section can be highlighted in the model.
Move to cutting and export the list
In cutting mode you see the graphical layout for every group. Marking and export to PDF, Word or Excel are available from there as well.
Three windows — the entire workflow
This is not a separate program and not an export to some outside calculator. Everything happens inside Revit, in three windows.
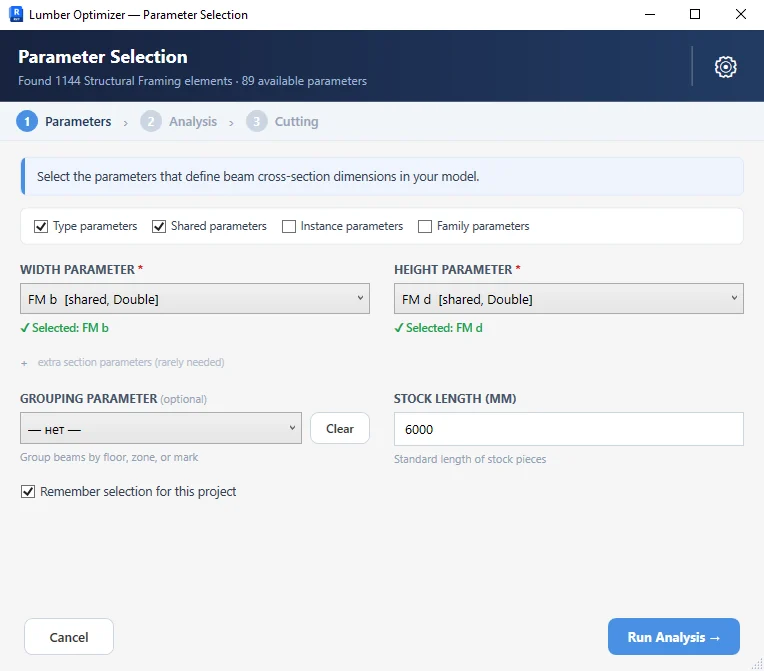
1. Start window
Section parameters, grouping and stock length. The settings are remembered between projects.
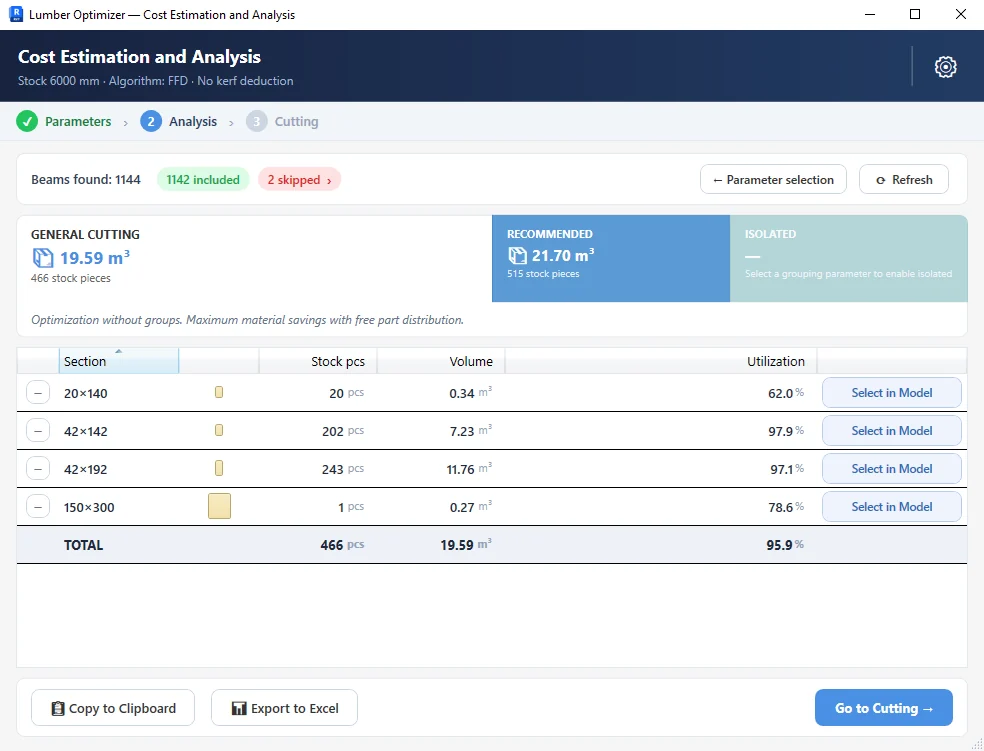
2. Estimate window
A table of every section in the frame: volume, count and lengths. Artefact beams and elements longer than the stock are visible right away. Any section can be selected in the model with one button.
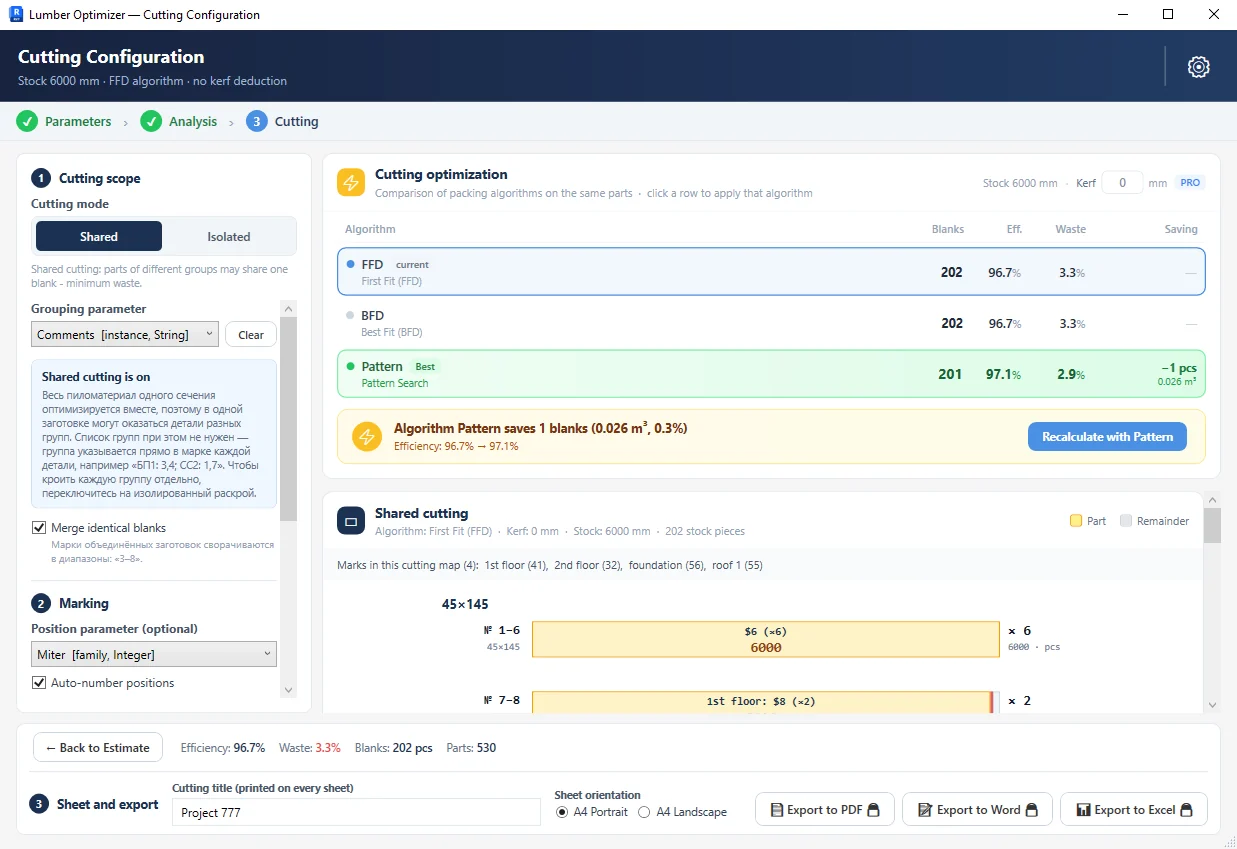
3. Cutting window
A graphical layout for every stock piece, part marking and export of the cutting list to Word, PDF and Excel.
Algorithms: which one works when
Cutting is a classic bin packing problem. An exact solution cannot be found in reasonable time for large volumes, so three approaches with a different balance of speed and quality are used.
FFD — First Fit Decreasing
Fast and predictable. Available in the free version.
Parts are sorted by decreasing length, then each one is placed into the first stock piece it fits into. If it fits nowhere, a new stock piece is taken. Gives a good result almost instantly and suits cases with many parts and a small spread of lengths.
BFD — Best Fit Decreasing
Denser packing on mixed lengths. PRO.
Differs from FFD in how the stock piece is chosen: the part goes where the smallest remainder is left after placing it. Takes slightly longer to compute but usually produces less waste on sets with very different lengths.
Pattern — pattern-based cutting
Maximum saving on repeating lengths. PRO.
Builds optimal fill patterns for a single stock piece by solving a bounded knapsack problem, then replicates the best patterns across the whole volume. Most profitable when the project has many identical parts — typical studs, joists, rafters, log courses.
The plugin computes every available option and highlights the best one by the number of stock pieces. In the free version the comparison is visible, but recalculating with BFD or patterns is available in PRO only.
Cutting modes
General
When you need the minimum amount of material and it does not matter which wall a part comes from.
All elements of the same section go into a common pool and are cut together. Gives the smallest number of stock pieces, but parts from one stock piece may belong to different parts of the building.
Recommended
When you need an honest figure for the estimate and procurement.
A middle ground between the worst case (each part from its own stock piece) and perfect packing. It accounts for the fact that cutting on site is never perfect and gives a realistic purchase volume with a margin.
Isolated
When crews cut by work zones and material is not mixed.
Parts from different groups (for example different levels or walls) never end up in the same stock piece. More material is used, but the cutting fully matches how the work is organised on site.
Marking and export
Every part receives a mark in the form “Group-Stock-Position”. The composition of the mark is configurable, so it can be adapted to how the crew looks for parts on site. The mark is written into the chosen element parameter and then flows into ordinary Revit schedules on its own — marking is available in the free version as well. The cutting list is exported to PDF (laid out and ready to print), Word (formatted differently — convenient to paste into your own templates) and Excel (for calculations); export is available in PRO.
Licence and activation
A PRO licence is activated in the plugin settings window: paste a key in the form XXXX-XXXX-XXXX-XXXX and press “Activate”. The plugin sends a five-component fingerprint of the computer to the server and binds the licence to that machine. Up to two workstations are active at the same time. To free a seat, press “Deactivate” on the computer you no longer need — after that the key can be activated on a new one.
XXXX-XXXX-XXXX-XXXX
Frequently asked questions
If something went wrong
Before contacting support, collect this information — it lets us answer more precisely and faster.
- The Revit version and the plugin version (shown in the settings window).
- What exactly happens: the full error message or a screenshot of the window.
- Whether the plugin works on another model — that shows whether it is the model or the installation.
- The licence key, if the question is about activation.
Describe the problem in the contact form — we usually reply within a day.
Contact